How to Make Colorful Soap: Day Two
 Ok, today’s process is fairly easy. Start by chunking up the colorful soap. I discount the amount of water that I use upfront in my soap recipe so my soap is ready to cut the next day. If you don’t use less water in your recipe, just wait the usual amount of time that you need to cut your soap. Otherwise you might have a smooshy mess!
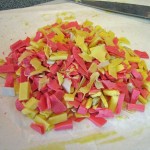
 In case you hadn’t noticed by now, I’m making a pretty large batch. These are all my soap chunks – half my batch of soap.
 I also shredded up the leftover shavings. There is no waste! Now get ready to make the other half of your batch of soap and get the mold ready that you would normally use. I use log molds myself.
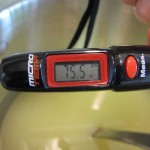
 (If you aren’t a soapmaker and you are just reading this for fun, you can skip this section. It just says blah, blah, blah if you don’t speak soap-ese.) Remember how I said that I melted all my oils yesterday for this batch? As you can see, they are now room temperature – 75.5 degrees. I will also cool down my lye solution to room temperature. I do this because the discounted water method speeds up trace, and I don’t want a solid block of soap before I can get it into the mold! Starting with cooler oils and lye solution will help slow the trace back down to a more manageable time to work with the soap. I’m so glad Elizabeth of Gassner Custom Soaps introduced me to my new favorite gadget from Cabela’s. Now I can check the temps of both the oils and lye solution with the touch of a button!
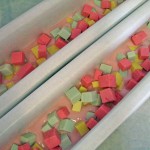
 Once I got my base soap to a light trace, I added more of the same fragrance and some FD&C red to make a medium pink. I poured a thin layer (about an inch or so) in the bottom of my molds. Then I started adding a layer of soap chunks. I had to do it this way because my soap pot wasn’t big enough to put all the soap chunks in with the base soap. I would recommend just dumping the chunks of soap directly into the pot if you can and stirring with a spoon. Tomorrow we’ll find out how many air holes I ended up with by doing it this way!
 After doing the first layer, I did dump the rest of the chunks into the soap pot and stirred it up. I did a lot of smooshing into the mold to try to fill all the crevices around the soap chunks.
Stay tuned tomorrow for the final reveal! I can hardly wait myself!!
Page with Comments
Comments are closed.

Looks great! And don’t you just LOVE that thermometer! Hehe
I am so inspired to make my first batch with imbeds!
Can’t wait to see how it turns out!!!!!
Thanks, Elizabeth! You know I do!!
You go, Trisha! It wasn’t very hard, really. Just time consuming.
Ok, RahRah, the final soap has been revealed! Let me know whatcha think! 🙂