Hair Chalk Recipe and Tips
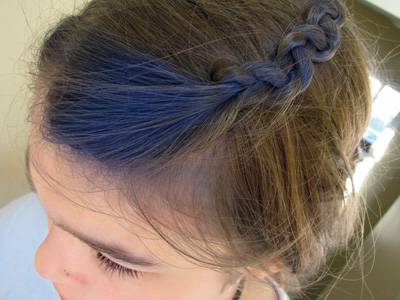
If you subscribe to the Brambleberry newsletter, you should have received a recipe for making hair chalk about three days ago. My nine-year-old daughter has been asking for a blue streak in her hair for quite some time, but I never wanted to do it permanently, so we decided to try this out with some ultramarine blue! Brambleberry states that the chalk should wash out in the first wash – or two, if your hair is very light. Be warned: this can be a very messy thing to make if children are involved!
Hair Chalk Recipe from Brambleberry
2 Tablespoons Colorant (We found that oxides and Bramble Berry neon pigments worked best and micas didn’t really work at all; they just crumble apart.)
1/2 Teaspoon Kaolin Clay
1 Tablespoon Witch Hazel
1/2 teaspoon Arrowroot Powder
1/2 teaspoon Water
Equipment Needed:
Gloves * Apron * Spray Bottle with water * Comb * Blow-Dryer * Hairspray
To Make Hair Chalk
ONE: Mix dry colorant and kaolin together in a bowl big enough to stick both hands in.
TWO: Place arrowroot and water in a separate small container and microwave for 5 seconds. You do not want it gummy, just slightly thickened. If it’s not thick after 5 seconds, try again on three second bursts. (Amy’s notes: when they say thickened, it means just starting to gel or coagulate. If you do not reach this stage, the chalk will NOT form.)
THREE: Add the witch hazel to the dry powders, and hand mix together (while wearing gloves!). Once well mixed, add arrowroot powder and water slurry. Really squish the mixture together. You don’t want it crumbly or wet, or to have bits of undispersed clay. It should have texture just like kid’s modeling clay. If it is too dry, spritz witch hazel one spritz at a time until correct consistency is reached.
FOUR: Roll mixture on a piece of parchment paper until you get the shape you like. Allow to air dry overnight.
To Apply Hair Chalk
ONE: Put an old sheet or towel over the shoulders of the person you’re applying the color to. Wet designated area of hair desired to be chalked. We used a spray bottle of water. (Amy’s notes: I would put the person in a bathtub as well. We ended up with some crumbled bits of hair chalk on the floor.)
TWO: Wearing gloves, apply the chalk to the wet area by dragging it along the strands. Use your fingers to rub the chalk into the hair really well.
THREE: Once you’ve reached the desired amount of coverage, comb through the hair to evenly distribute the chalk. (Amy’s note: your comb will turn color, but you should be able to wash it off.)
FOUR: Heat-set the chalk using either a blow-dryer, curling iron, or straightener. A curling iron or straightener may not be the best idea for those with damaged hair. You can also straighten or curl the hair after you blow-dry it. (Amy’s notes: I applied a LOT of chalk to her hair. After drying it with a blow-dryer, the hair got really stiff and we had to comb through it again. This was another somewhat messy step, as you could see the dry chalk flying.)
FIVE: Spray chalked hair with hair spray so that it doesn’t brush off onto clothing.

Amy’s Insights:
The good news is that the blue hair chalk washed out completely after the first shampoo! We attempted to make more hair chalk this morning because her sister wanted to try it, and we thought we might make some for Christmas presents. Her sister wanted a lime green, so we combined regular green oxide with yellow oxide with a 2:1 ratio. It seemed to work fine – except that I forgot to add the witch hazel to the colorant and kaolin clay and instead put it with the arrowroot powder and water. The consistency was a little off, so she ended up smearing more of it on her gloves and the waxed paper and didn’t end up with as much chalk as her sister did. Oops!!
We also attempted another hair chalk with the electric bubblegum colorant and I made the same mistake! Only this time the slurry hadn’t really gelled at all, so I ended up really ruining it. After combining the slurry with the colorant and kaolin clay, the chalk wouldn’t form at all! I tried to put the whole thing in the microwave for a few seconds to help it set up, but we ended up with hard chunks along with watery parts and had to throw everything out. The electric bubblegum colorant really stains the skin, so I’m not sure I would recommend using it for hair chalk unless you were being really careful and NOT applying it around the hairline. Lesson learned: FOLLOW THE DIRECTIONS!!
UPDATE:
I just made 5 more batches. I tried following the recipe and made another batch with the bubblegum pink – another failed batch!! First of all, when you only combine the arrowroot powder with the water, after 5 seconds in the microwave, you have a solid ball of goo. I really think adding the witch hazel with the arrowroot and water is the way to go, and I’m sure this is how we must have made the first blue batch which turned out so well. I never could get the pink batch to solidify. Tried adding more arrowroot slurry, more kaolin clay…nothing worked. I ended up with a big glob of pink goo!!
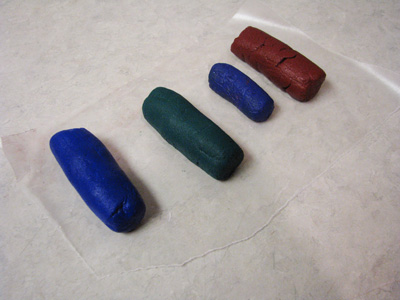
Next batch worked out perfectly! I used hydrated chromium green oxide this time and only combined the oxide with the kaolin clay. I made the slurry out of the witch hazel, arrowroot and water. The key for me was to make sure the liquids only filled the measuring spoon until it was level (no extra rounded top!). With my microwave, I figured out that six seconds was good for the first burst (take it out and swirl it around in the cup), then two more four-second bursts (swirling it around after the first one, and stirring with a spoon after the second one). It was just starting to gel at that point and I could stir it up until it was just thickened.
After that I made a batch with ultramarine purple and just a bit of ultramarine blue. It came out too sticky because I added too much liquid up front (make sure it’s LEVEL in the measuring spoon!). Even after adding more kaolin clay, I lost half of it because it was stuck to the sides of the bowl.
Next I made another ultramarine blue batch that turned out perfectly. (See I’m learning!)
Finally I made a batch with brick red oxide that half worked. It turned out extra dry, and I’m afraid it’s going to crumble when it’s applied. I tried adding more witch hazel…no luck. Then I tried adding more water…again no luck! It just didn’t want to stick together like the hydrated chromium green and ultramarine blue did. Photos of the final products:

Hoping to gift these to my nieces tomorrow!
Page with Comments
Comments are closed.

Your daughter’s hair looks great.
http://www.twobloomsdesignstudio.blogspot.com
Thanks, Michelle! I think we’ll try it again tomorrow! 🙂
Wow, Amy, what perseverance you’ve shown with this project–that’s a lot of batches in the last few days! While I’ve never personally felt the urge to add a streak of color to my hair, I love DIY projects and I’m glad you mastered it! 🙂
Amy I admire your determination! I will try this after Christmas for my daughter. It might be a fun thing for her to do at her 13th birthday. We tried colouring her hair with koolaid and that was just too time consuming and didn’t give the nice bright colours like you showed with the chalk. Thanks again for sharing, and Merry Christmas to you and your family!
Tina
wow! Loved reading about all the trials you did! Very cool.