The Long Road to Rebatch
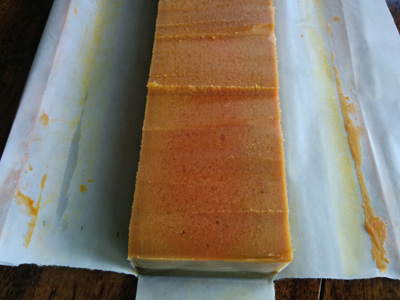
I have been making pumpkin soaps with fresh goat’s milk and real pumpkin puree for many years now. Usually they are plain brown with mica stamped pumpkins on the front. This year I was going to try something new and different. I made a three-layer soap with fresh goat’s milk and fragrance in all three layers, and added pumpkin to the top and bottom layers. I also added some brown mica to the bottom layer and a bronze mica line between the bottom and second layers, and added some orange mica to the top layer. The next day I planned to cut the soap, and found an oil slick on top of the soap. I decided to let it air out for another day to see if the oil would absorb back into the soap. It didn’t. So I wiped it off with a paper towel:

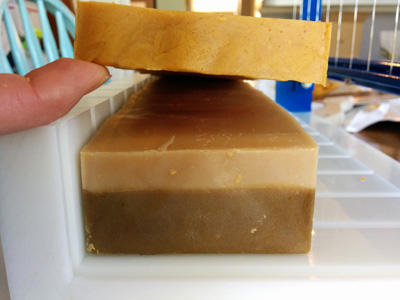
I took the soap out of the mold and cut into the top layer to see what was inside, and it wasn’t pretty:

My theory at this point was that the soap in the top layer had started to heat up and saponify in the pot before I poured it into the mold. By stirring it up, I interrupted the process and it started to separate. It had started to go into “hot process mode” but because I didn’t continue to heat and stir the soap, it got stuck in the separation phase. I don’t know the technical terms for the chemical process at this point, but it’s what you might call “applesauce stage” with hot process soap.

My solution to this problem was to scrape off the top layer and chunk it up in the crock pot with the hopes that I could spread it back over the top and salvage the soap. This was not a small batch, so there was no way I could put the entire thing in my crock pot, nor did I want to disturb the first two layers which appeared to be so perfect underneath!


The fresh soap melted down easily without adding anything to it. In fact, I started the crock pot on high for a short time, then switched it to low and stirred every hour or so until it was completely melted. I re-lined my soap mold, put the first two layers of soap inside, then spread the top layer back on.

The next day I was excited to see how my “salvaged” soap turned out. I lifted the soap into the cutter, and what do you know – the hot-processed layer separated from the rest of the log!

So I did what I had to do. I took the top layer off and cut it into mini soap bars to donate to a local ministry that helps refugees in Kansas City.

Once I decided to cut up the rest of the soap and re-batch it, I discovered that the bottom layer didn’t hold together so well either. I had to melt it down in several batches in my crock pot.

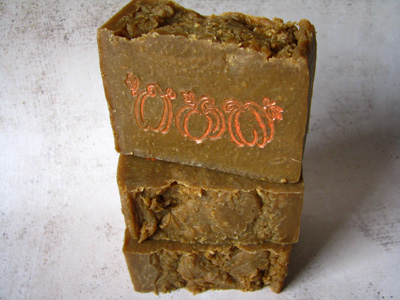
What did I end up with? Plain brown soap with mica stamped pumpkins on the front.

So why did the soap separate this year when it hadn’t in past years? My theory is that I used too much pumpkin. I used nearly the same amount of pumpkin in just two-thirds of the soap that I used in a full batch in previous years. It could also be the temperature of the pumpkin. In the bottom layer, the pumpkin puree was actually pretty cold out of the refrigerator. As I was pouring it into the soap, I realized that might not have been a great idea. So for the top layer (the one that separated a lot), I warmed it up before adding it to the soap. Obviously, the soap was already starting to heat up before I added the pumpkin – probably due to the goat’s milk. Normally, I would mix everything up and pour it all it once before it got too hot. With this soap, I was adding fragrance to each layer and waiting for them to set up before adding the next. Quite a bit of time had passed by the time I added the top layer, and the outside of the container felt pretty hot when I finally poured it.
Oh well. The rustic look isn’t so bad. Just wish I didn’t have to go through all the trouble to get there!
Page with Comments
Comments are closed.

Thanks for this Amy. I am about to make pumpkin soap myself and I now know to make in one batch without trying to get fancy. ????
Soaping would be boring if it always worked out. The rebatch looks pretty good though.
@Lesley – I really think it might have been ok if I had used less pumpkin or left out the goat’s milk.
Somehow, I don’t think I’d mind if this one had worked out, but the rebatch isn’t too bad. 🙂 Thanks, Odette!
Oh gee Amy, sounds like a very frustrating soaping experience 🙁 The layers looked super nice too, but I really like the rustic look of the hot processed soap also!
I think it looks Great for this time of year~ Glad you could save it!!
@LongLeafSoaps – Not at all what I had planned, but it’s a workable outcome anyway! 🙂
Thank you, Linda! It’s nice to hear from you. 🙂
Hi Amy! Thanks for sharing all your pics and steps! I was not exactly surprised that the top hp soap lifted off after cooling because there wasn’t anything for it to attach to. I wonder if you had of scored the 2nd layer a bit if it would of adhered? Then there is that bottom layer right? ????In the end a really good visual learning exercise and your final hp bars with the gold stamping are really pretty! Thanks for sharing! Susan
I think the soap gremlins are out with our wishing for cooler weather!
@Susan – I shouldn’t have been surprised that the top layer separated off – I know better! Wishful thinking…
@Elizabeth – Are they messing with you too??
I had a similar problem with 2 different pumpkin batches this year. They glopped up quickly and I had to toss them in the mold. One looked like it had chunks of orange pumpkin puree in it (even though it was mixed in quite well), and another had an oil slick on top, but fortunately these both dried up. Your rustic rebatch looks much better than my soap does.
Awww, that’s too bad, Sandy!! 🙁
It still turned looking good – rustic. That looks like the longest soap mold I’ve seen! how much does that hold?? Also, do you mind sharing which fragrance oils you used? I’m curious. Thanks for all the great pictures and sharing your struggle with us so we can learn something from it, too. 🙂
Thank you, Angie!! Yes, my mold holds 90 oz of oils – a little over 8 pounds of soap. I used the Pumpkin Apple Butter fragrance from NG. Smells pretty great!